Our Tensa4 hammock stand has always been a good value, exceptionally adaptable, accommodating more hammock types and sizes, lighter, and with a smaller footprint and packed size than others.
With the February 2025 release of our seventh production series (P7) and the addition of our Freestanding mod, Tensa4 becomes even more versatile. Now you can hang up to six hammocks with just a few extra components. I made a rambling YouTube a few days ago excitedly sketching possibilities of our newest pole tip design, that has produced many email queries for clarification. This post elaborates. To help understand the drawings below, orange are lines in tension, while gray are poles in compression.
One hammock, one guyline
This is the classic Tensa4 configuration, working with:
Gathered-end hammocks up to 12′ long
Bridge hammocks like Warbonnet Ridgerunner
Transverse hammocks like Amok Draumr
“Lay-flat” designs like Haven Tents
It works even on steep slopes, often available when all flat spots are occupied. Just point the head end upslope to level the two feet. While only one guyline is required, you should guy both ends for most stability.
One hammock, freestanding
With our Freestanding mod, Tensa4 now hangs gathered-end hammocks in the smallest of spaces, able to fit a 12′ hammock in a 7′ x 9′ room, no guylines required.
The ultra-stable tripod base adds little width beyond that of the hammock itself, pointy ends allowing placement in corners, to use the longer diagonal measure of a room. Note how the higher foot end can float over obstructions like a hotel room bed.
Two hammocks, one support
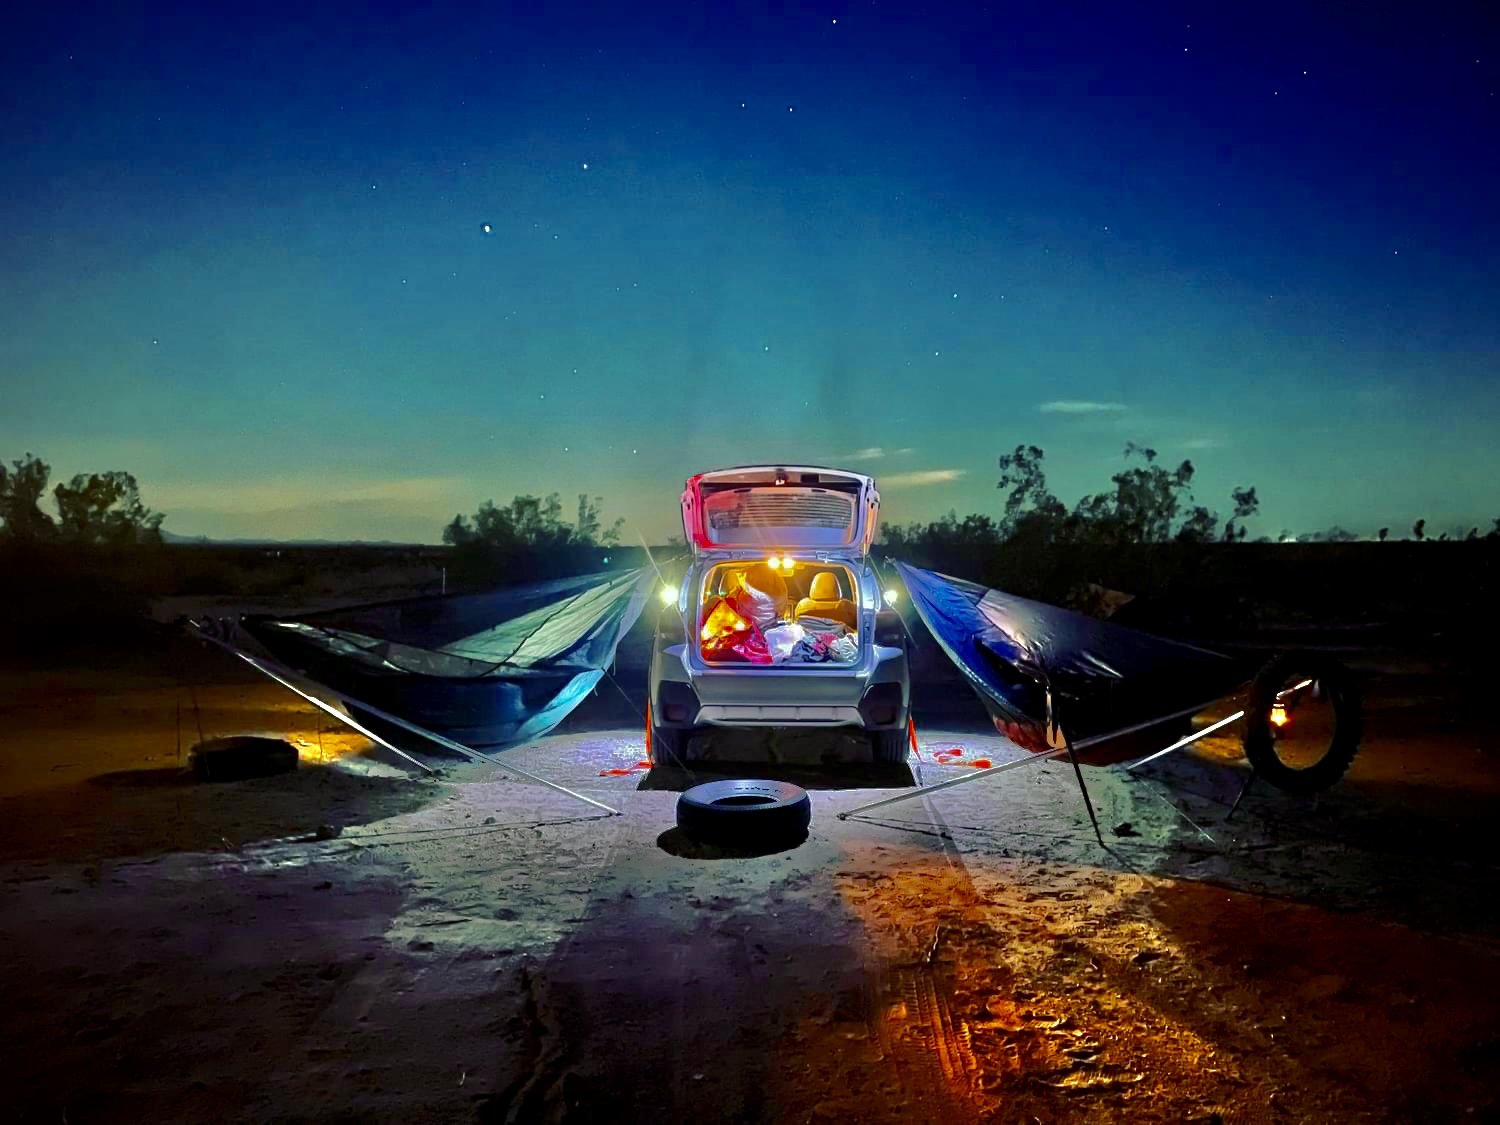
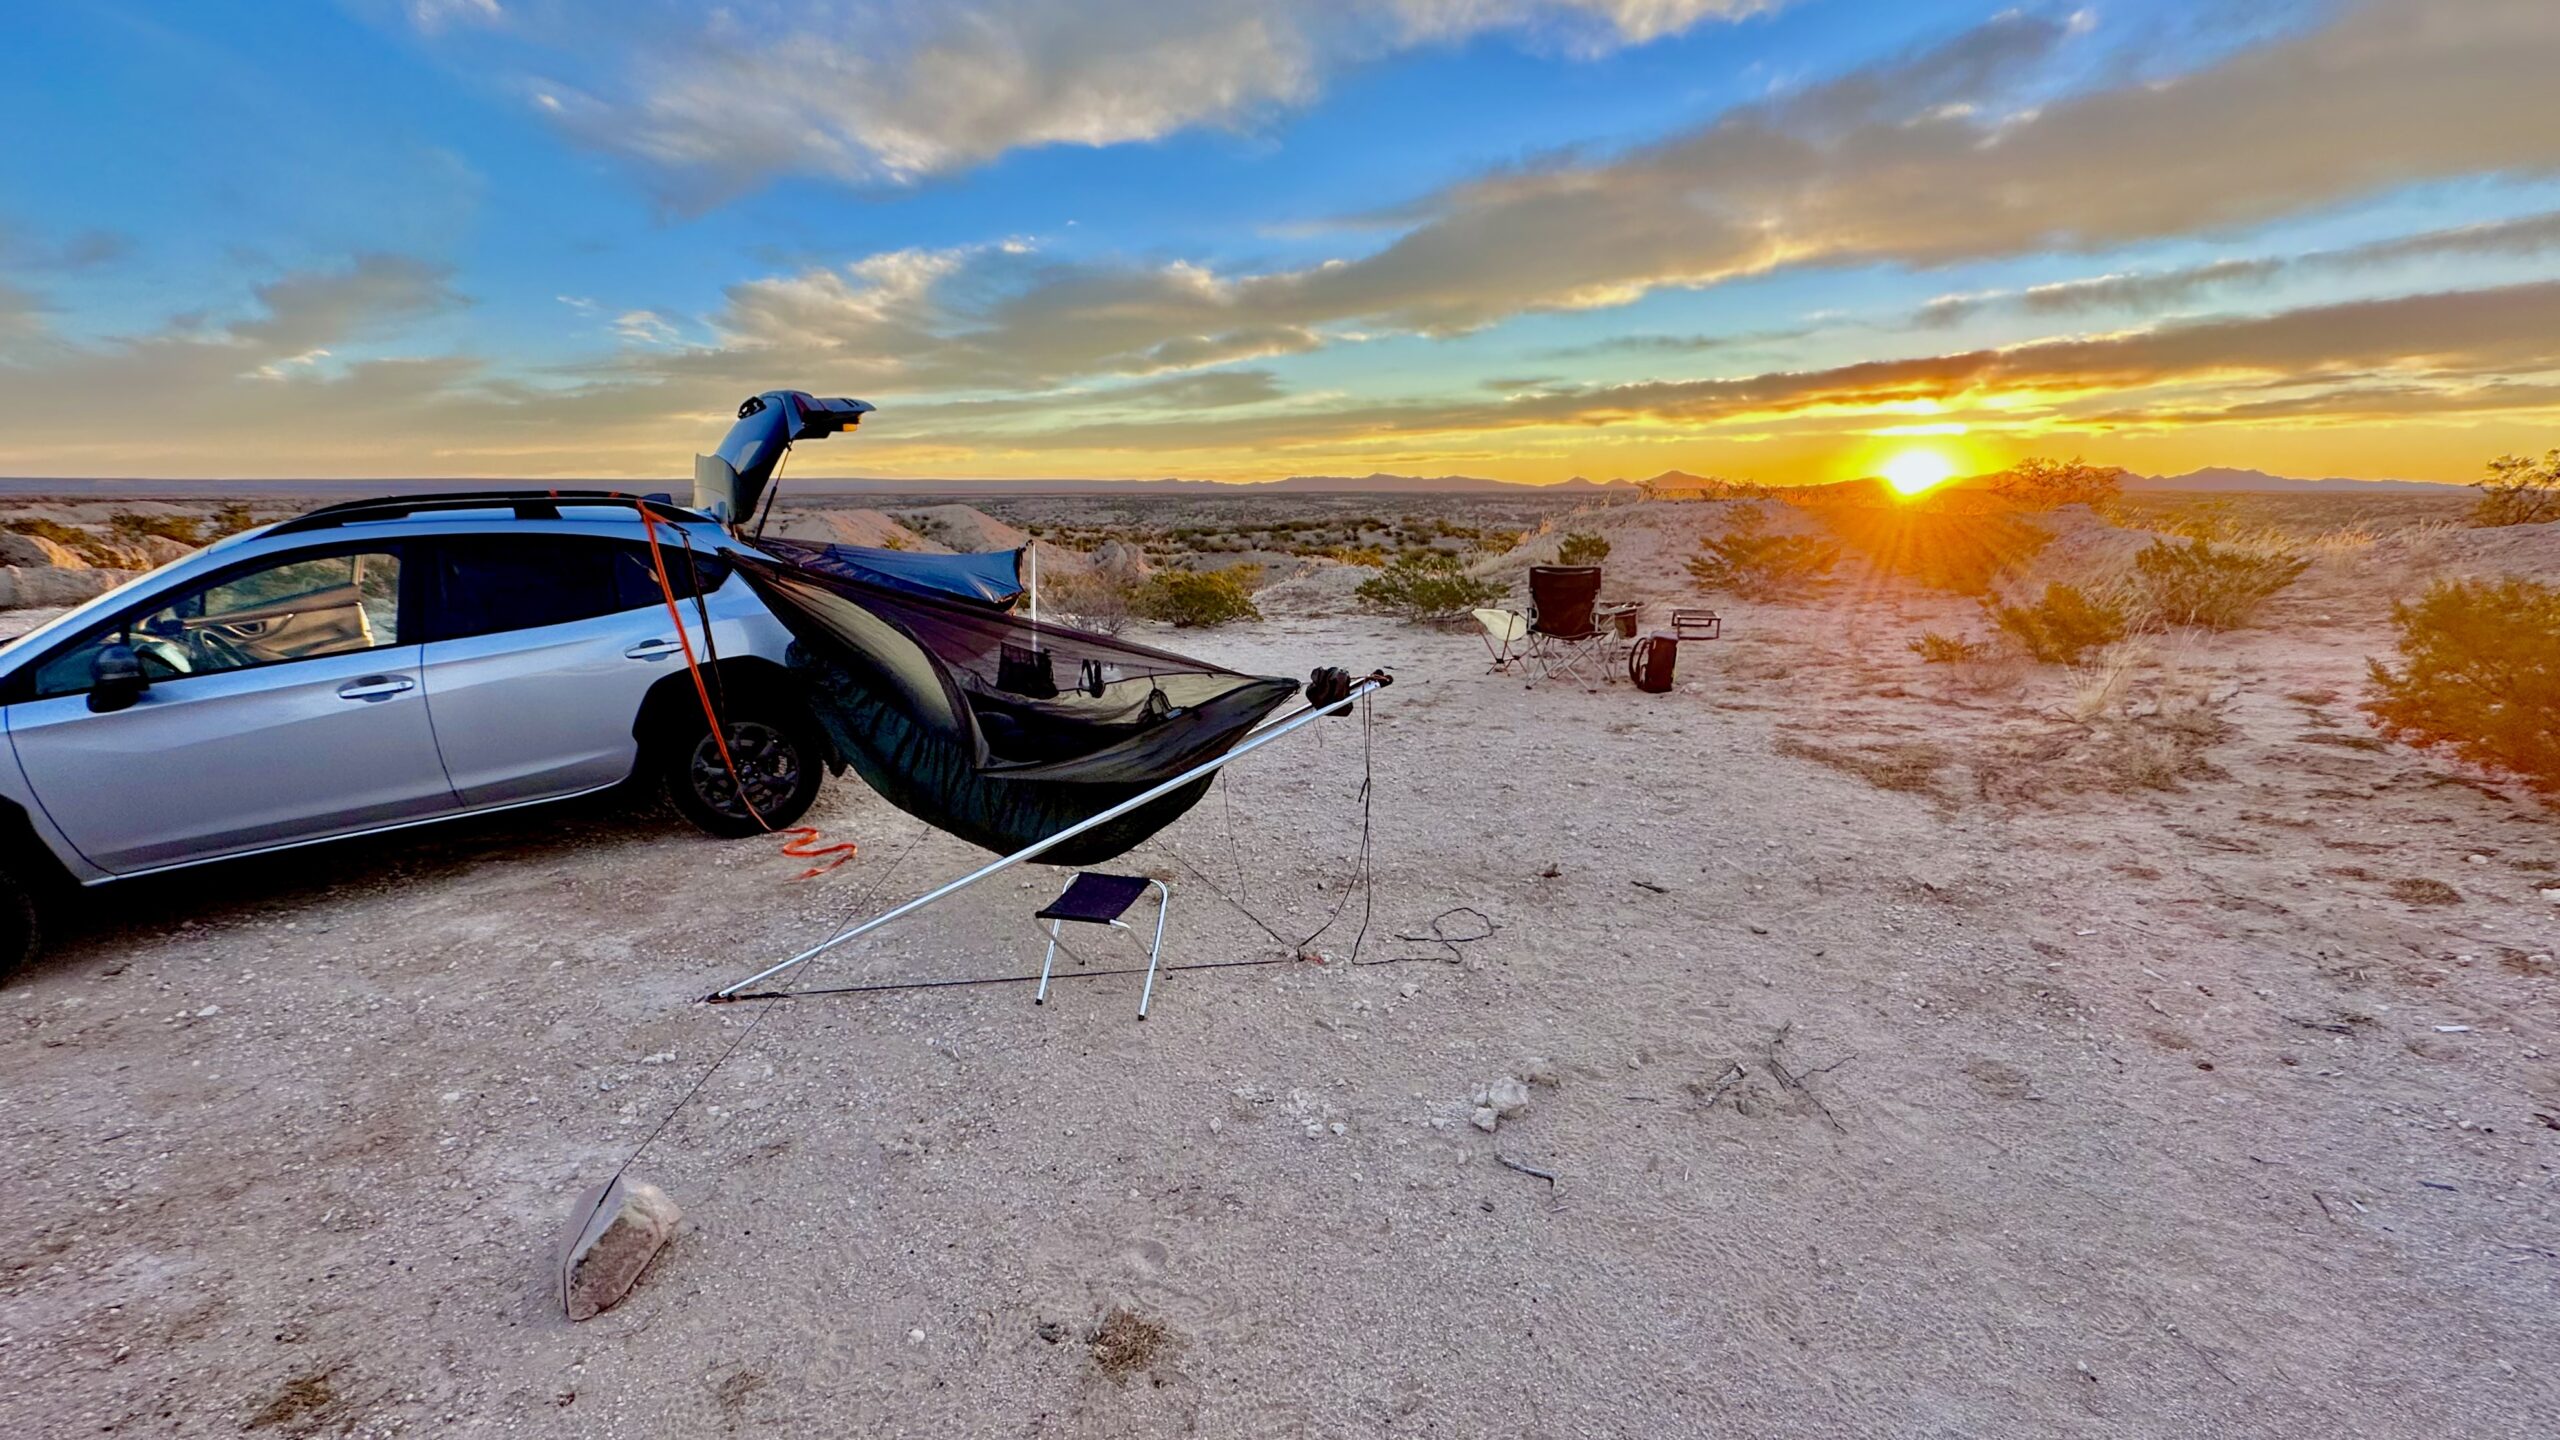
Use two of Tensa4’s four poles to hang the head end of a hammock in split mode, with the foot end hanging from a tree, pole, or vehicle. My drawing’s perspective is poor, but compare with the photo, matching the important elements to understand how it works.
Starting with P7 of Tensa4, whose poles now allow loading while partially collapsed, all four can work as monopod stands, like our Tensa Solo. Simply collapse a 7-segment Tensa4 pole to 5 segments long. The top segment becomes the tarp extension.
Tensa4 includes everything needed for a one-pole setup. Each additional pole requires two more guylines and anchors, which we sell a la carte. Your existing tree suspension can also work as guylines.
(True Tensa Solo poles, whether bought ready made or from our Tensa4 to Tensa Solo conversion kit, weigh almost a pound less, and pack in half the space as Tensa4 poles, so they remain a better choice when that matters most.)
Three hammocks, one support
Mix and match the split and monopod modes for more hammocks. Split stands require only one stake, and have a smaller footprint than the monopods, making the splits preferable when feasible.
This requires three extra anchors and guylines plus one extra toggle loop beyond what comes with Tensa4.
Four hammocks, one support
Oh yes.
This takes six additional guylines and anchors beyond the base Tensa4 kit. You can pitch tarps, but with 16 tarp guylines plus 8 for the poles, things can get busy!
5-6 hammocks, 1-2 supports
Are we getting a bit contrived? Also yes. But, if you’ve got the Freestanding mod, you could repurpose its 9-segment ridgepole to make 1-2 more monopods, to hang the better part of a Scouting troop, a complete lesson in physics and resourcefulness. We leave to you what this looks like, and how many extra bits you’d need.
A comfy chair
Poles and ropes came before the wheel, and maybe fire, in human ingenuity. Cheryl made herself a hanging chair mount in a few moments at Joshua Tree National Park, where it is not permitted to hang from rocks. The same approach would make a field dressing hoist for game, just as quick.
Be prepared
Tensa4 is growing into the LEGO® or Erector Set® of hammock stands, letting you hang your whole crew from a compact bundle. Just like those kits of parts, we can’t provide step-by-step instructions for every possible setup, since these will vary with your hammocks, tarps, site conditions, and indeed your imagination. You should practice before relying on any of these setups.
Over the past several months, we’ve been developing and testing a free-standing modification of our flagship Tensa4 hammock stand. We are now processing materials to offer this kit for sale in early 2025. We’ve shared most information so far across social media. This post compiles much of that into one place, also offering DIY tips.
Why Freestanding?
Our original Tensa4 design is well loved for its simplicity and versatility. With only two feet on the ground, it works well in tight spaces and on slopes, but relies on at least one guyline to remain stable. This is a dealbreaker for some, especially indoors where attaching guylines isn’t always practical.
We’ve been tinkering for years to make Tensa4 freestanding. Many schemes worked, but often sacrificed capacity, stability, portability, or ease of use. We made a breakthrough in August 2024 with a surprisingly simple approach. Behold!
Key features
Compact footprint: hangs a 12′ hammock properly in a room as small as 7′x9′. The tripod base, of only 17 square feet, allows placement in corners with the foot end floating over furniture.
Portable and lightweight: When packed without the standard Tensa4 guylines and anchors, Tensa4-FS weighs only 16 pounds and packs into a bundle 20″ long and 6″ around. One person can easily move the stand fully set up with hammock hung, with no need to reset guylines.
Adaptability and value: Like standard Tensa4, compatible with up to 12′ gathered-end hammocks, splittable to hang two hammocks from a single support like a vehicle, and converts into Tensa Solo for hiking. Very easy to tilt hammock to suit desired amount of height difference between ends, even to extreme “chair mode.”
Quick setup: Transforms from an easily stowable 5′ column into a full stand in about 30 seconds. Full setup or breakdown takes a few minutes.
Solid tree-like feel: With a more fixed geometry, Tensa4-FS provides a secure, stable hang that’s less sensitive to adjustment, site, and technique than standard Tensa4.
How it works
The standard Tensa4 design uses four poles in compression (gray), and three lines in tension (orange: baseline, ridgeline, and foot-side guyline):
Tensa4 Freestanding replaces the ridgeline with a ridgepole, and the foot guyline with a head support pole. This forms a tripod, while shortened foot-side poles shift the center of mass well into the tripod for excellent stability:
Limitations
While standard Tensa4 works with gathered-end, bridge, and transverse hammocks, we support Tensa4-FS only for gathered-end types. Standard Tensa4 also supports tarps very well, while tarp support for freestanding mode is less simple. At minimum, our Tarp Extensions for Tensa4 are required even for 11′ tarps. Five poles compete for space at the head apex, which is crowded. We think Tensa4 Freestanding is most compelling indoors where tarps are not necessary. We suggest that users set up Tensa4 in whichever mode best suits their needs each time. There is no problem switching back and forth, as parts for both modes still fit in the carry bag.
DIY information
If you already own Tensa4, don’t want to wait for our modification kit, or you want to start with your own build, here’s what you need to know:
Ridgepole
Length: Should be 7-10% longer than the hammock’s ridgeline (e.g., ~120″ for an 11′ hammock). Our kit includes a 127″ ridgepole, suitable for most 12′ hammocks.
Material: 1″ EMT conduit should work. We haven’t worked out minimum diameters, wall thicknesses, material strengths to offer guidelines for various weight ratings. But our 9-stage telescopic ridgepole’s middle segment is 32mm OD, 1.5mm CS 6000-series aluminum, and we’ll warrant the kit up to 350lbs in the hammock.
Attachment: Ensure the ridgepole connects securely to the stand’s apexes while allowing movement to prevent binding. We thread our Amsteel ball loop connectors through holes in the tubes’ end fittings.
Head support pole
Size and strength: 48″ to 54″ tall, capable of bearing ~150 lbs. Options include stronger trekking poles like our Trekking Treez, our Tensa Solo, or tarp support poles. A broom handle? Our kit features a strap from the top with a height adjuster buckle, where the strap is also threaded into the connection point of the poles meeting at the head end.
Stability note: Always check that the head support pole is vertical before entering the hammock, especially on smooth or hard surfaces.
Foot side poles
Shorten the foot-side poles to about 87% of the head-side poles to improve stability, such as by not fully extending collapsible poles. Our kit includes newly designed feet to prevent damage to pre-2025 Tensa4 feet designs when loading incompletely extended poles.
Update: Travis won in all categories, with the brief instructional videos now adorning our Tensa4 and Tensa Solo product pages.
We need video help, and we’re offering prize money. The photo above is to help this blog article get seen. We made a not-clear-enough video about how it’s done.
We are grateful for our many happy customers. This is in spite of our written product instructions, that seem always either missing detail, or too long to read. You’ve figured it out, but it should be easier. Most new customers and shoppers want video. We know that our own video production skills are not great, and that we are maybe too close to our products to see them with beginner eyes, to know what needs more or better explanation, and what doesn’t.
We know that many customers already turn to YouTube for help setting up. They find mostly reviews and sometimes shaky “first impressions” instead of confident detailed instruction. Some instructional material is mostly good with a few errors that make us cringe. Some otherwise good videos are obsolete because we’ve changed the product.
That’s why we’re asking you, our customers, to make videos we can compile into curated playlists, to help other customers learn from your experience. We’ll pay you for your effort and skills, and you can also promote your channel, brand, or passions along the way, as long as the focus remains on how to use our products. We hope to “seed the clouds” of our creative customer base instead of hiring hammock-indifferent professionals to make slick videos that don’t capture our customers’ proud enthusiasm.
We have always seen the variety of good ways to assemble and use our stands as a strength. Showing only one way to do things gives a false impression that it’s the only way. Meanwhile, a single video showing many ways to do similar things would be too long and confusing. So let there be many, with a variety of personalities, styles and settings more engaging than what we can muster!
Specifically, we want setup videos for each of our three hammock stands. Examples include, but are not limited to:
Tensa4: first-time basic, on slopes, indoors in hotel rooms, with various hammocks including long and short gathered ends, and various “lay flat” types like bridge, Haven, Amok Draumr, showing different anchoring techniques on different challenges. Using Tarp Extensions. Splitting the stand to hang two from a single support. Joining several together. Wow us with your smooth two-minute setup from bag to reclining, or take a beginner by the hand the slow way through each hand step with clear closeup shots!
Tensa Solo: Basic setup with a single pole and one tree, or two poles. Conversion from Tensa4. Anchoring strategies, including detail on all three of the kinds of anchors we offer, with both guyline types. Use with a bicycle or motorcycle as one support. Tensioning and milking the bury of Amsteel guylines, by wrapping the tails around the pole and pulling backwards for mechanical advantage!
Tensa Trekking Treez: Basic and advanced setup/anchoring for backpackers. Conversion between trekking pole and hammock modes. How not to destroy your tarp lifters by always guying them out properly!
We will pay $100 for each video we choose to add to our public playlist for each of these three product categories, with no quantity limit. In addition, on Black Friday 2023, the entry we judge best in each of these three categories will receive $200, with a grand prize for the best single video of $500. Only one Black Friday prize per video. For example, let’s say you submit three videos that we list: you get $300. Then on Black Friday we deem your Bikepacking with Tensa Solo short the best in category: you get $200. But finally your Tensa4 split-stand kayaking video is so well done that we deem it best overall: you get $500. These add up to $1000 for the three you submitted.
We will link to your YouTube channel if you wish, so you can ad-monetize, maintain ownership, as you prefer. If we love your work and you’re willing to make more with edits going forward, we are open to a longer term business arrangement at market rates, because we keep changing things.
Rules for submission
Product-specific instructional focus, not overviews, brand lifestyle/marketing, or reviews. There is some overlap, but our main goal is to help customers use our stands in detail, not to sell them. Making happy customers is our main marketing strategy, the ones whose setup experiences are easy enough even the first time, and who feel like experts after half a dozen outings. Help us show them. You may even teach us some new tricks that we can roll into print instructions.
No single video longer than ten minutes. Imagine a person with one bar of phone signal trying to set up their stand for the first time without print instructions: make it worth any wait with tight editing. Multiple videos are fine, as long as edited to make sense without having watched others. Two-minute and even shorter portrait-mode videos welcome! What single problem solution or insight are you most proud to share?
When showing close detail instead of broad concepts, the product must be substantially current. We change things often, because we are wired that way, but this contributes to our problem keeping instructions up to date. If you show us video-making skill with older product, we will very likely upgrade your gear to latest spec in hopes you will re-shoot. If you show one or two bad practices in an otherwise great video, we may ask you to edit or re-shoot. If in doubt about whether to show a certain technique, ask! We want you to succeed.
Production quality: at least high amateur. Minimal camera shake, good focus and framing. Easy-to-follow whether scripted or ad lib; live or voice-over narration, or none (mimes get the job done for our worldwide customer base). Naturalistic and casual is our preferred style, but if you can edit in some effective graphical overlays, more power to you.
G-rated. No socially contentious matter such as politics, profanity, controlled substances, firearms, etc. No depiction of unsafe or destructive practices, unless as a warning. Funny is great. People of all sizes, ages, conditions, ethnicities, sexualities or religions etc. warmly welcome.
How to enter? Just email us your YouTube link, public or unlisted.
Above is at Sonora Pass, around 10,500′. It was a windy night, but not too cold, and the hammock’s tie-outs kept the sway down. This was the only overnight two-pole hang north of the desert, as trees were usually available. Here I chose to hike past the trees for this morning view, to say nothing of the jaw-dropping sunset. Besides, here on this treeless side of the ridge was the first signal in days. It was a challenging hang, on steep loose scree where no ground-dweller would ever think to camp, but I’d gotten very confident of my Treez skillz by that point.
The end
Thanks to our unique product Trekking Treez, I believe I’m the first PCT hiker to have used only a hammock properly hung through 100% of the “unhammockable” sections of this trail. I thought often of the ancients of Central America who seem to have invented hammocks on this same cordillera in the tropics, long before Columbus, and how this same elegant technology is enjoying a renaissance among hammock campers all over the world. I’m proud to play the smallest part.
I hiked my best hike. I came home to Portland in early July from Dunsmuir, California, in the shadow of magnificent Mt. Shasta, near trail mile 1500 since Mexico. I wrote about all of my hike personally, and my decision to call it short of Canada on my Facebook, if that interests you. I’m still adjusting to life back in the fake world, slowly navigating a shallow depression after so many overwhelmingly beautiful, soul-shaking days stacked on end. I feel hollowed out and grateful. Tender blissful grief. It’s hard to move on from the greatest adventure of my lifetime by far (except maybe parenting, ongoing!).
It’s not always about the hammock: Trekking Treez as hiking poles
I needed Trekking Treez for hammocking only a few times north of the desert. The most unique thing about them is their hammock function, but they also have some unique features as trekking poles.
If I got a nickel for every set of broken poles, or parts of them, that I came across along the way, especially those abandoned in hiker boxes, I would be a few dollars richer. When you read reviews of ultralight trekking poles, you’ll see that a chief complaint is that they break. This is natural for anything super light. Light is nice for obvious reasons, but I wonder how many of the broken poles I found got replaced with something more sturdy?
Trekking Treez weigh about 12 ounces (340g) in hand, each. (There are more parts weighing about the same per pole in the pack.) This is lighter than some well-reviewed aluminum trekking poles on the market. But because they are instead carbon fiber at this relatively high weight, they are likely the strongest trekking poles you can buy. Most manufacturers using carbon fiber use this strong material to strip away every last unnecessary bit of it, resulting in exceptional lightness. We’ve gone the opposite direction, using the least amount of material necessary to produce poles strong enough to support adults in a hammock. As a side effect, they are strong enough to use in ways that would constitute abuse for ordinary trekking poles.
Icy snow
In the deep, steep, crusty snow fields of the high mountains in spring, an ice axe is often essential, especially to arrest falls on fatal icy chutes. Trekking Treez do not replace an ice axe for this specific critical function. The other main use of an ice axe is to plunge through the crust, deep into the snow, and use the head as a hand-hold, to prevent slipping and falling in the first place. TT are brilliant for this. I used them over dozens of hours traversing snowy spring slopes, never worrying that I’d snap one, even when my feet slipped and my whole weight was on the handle.
I had an ice axe with me in the San Jacinto mountains in March, but entering the Sierra Nevada in May, I brought no axe. This felt foolish on some of the hairier north faces of passes around 14,000′, but that also helped me appreciate that I had such stout poles to stab into the ice.
Water crossing
Safety at water crossings, especially whitewater, nearly requires poles. Hopping from polished rock to rock, or teetering on logs slick and shaky, it’s vital to plant the carbide tips onto the rocks above and below the surface for balance. The more weight you can safely transfer to the poles, the more confidently you cross. And if your tip slips down an underwater chuckhole, and you torque it falling, will it snap? TT aren’t indestructible, but I soon came to rely on them in ways I wouldn’t dare treat ordinary poles, even to vault across larger gaps with no run-up. I became proud of crossing a dozen or more fast streams daily without getting my shoes wet, Parkour-style, where hikers with normal poles would opt to ford, more slowly and with different hazards.
Super long reach
By the time I reached Yosemite, I had embraced another unique feature: their extra length. In normal hiking mode, the poles offer a typical range of height adjustment. But we offer pole extensions for hammock mode, because the foot end must be higher than any normal trekking pole. There’s no reason not to use hammock mode for other purposes, however. At maximum length, TT has the grips at a whopping 63″ (160cm)! I wish I had video of me gondola-ing across a harrowing high log over whitewater, where I used both poles fully extended for stability. We could rename “hammock mode” to gondolier or even trapeze mode. True gymnasts will love our poles even if they don’t hammock. I suppose John Muir would have chopped down saplings at these crossings, that today would violate Leave No Trace. Yes, we called them Treez for their hammock function, but there are many more uses of tree-like poles than hanging hammocks.
Who needs separate tarp poles?
I often hung my hammock between trees on steep slopes. Once, a chance of rain meant I pitched my tarp. The ground falling away downslope meant the tarp would block the view unless I could prop it up. Again, normal trekking poles would have been far too short for this. TT maxed out were just right.
A hiking staff by any other name
A cousin of trekking poles is the hiking staff. Carried singly instead of in pairs, hiking staffs are taller and heavier than trekking poles, meant to bear a user’s whole weight safely as needed. TT fits this bill perfectly when the tall hammock foot is installed. Admittedly, we haven’t tested how durable the hammock foot (as opposed to the carbide trekking tip) is when used over long distances, but on softer surfaces it should hold up pretty well, certainly better than hiking with the rubber tips covering the carbide. (Those feet fall off and get lost really fast; their best use is just to protect other items from the sharp carbide tips when the poles are packed.)
Actually innovative straps
Another feature of TT, unique in a market of barely distinct strap and grip assemblies picked from large factory catalogs, are the hand straps. It’s hard to get excited about straps, but these are special, developed just in time for my hike as a hard test. I made a video about how our ultra-wide, ultra-soft Ultrasuede straps replace sun gloves, sweat mops, and snot rags, and also encourage good technique by supporting your whole hands comfortably, so you don’t feel need to grip the grips, interfering with their free pendular motion. I forgot to mention in the video that adjusting the straps extra long, so you can hold the poles with only 2 fingers below the grips, reduces the swing weight of the poles. This makes them feel lighter in use than they are.
Make with the photos already
For the sake of a complete accounting, below are all instances where I used TT to hang my hammock in the Sierra and Northern California sections of the PCT.
Mt. Whitney summit
Yes, I pitched my hammock on the summit of Mt. Whitney, highest point in the Americas between Alaska and the Andes. It was about 20ºF and windy, so hanging to stay warm before dawn in my quilts was the best way. Hammocking in unlikely places is the new planking, according to my opinion anyway.
Mather Pass approach
Crossing the high passes of the southern Sierra in May, it is essential to camp high, wake early, and get over them before the sun softens the snow to extra danger. Here I camped above easily hammockable trees to enable that early crossing. It dropped to 15ºF that night, fortunately no wind. I woke covered in thick frost, however. I waited to pack up until the sun sublimated away the frost. The cold snap meant the higher snow was still crispy hours after sunrise.
Markleeville
Sweet little town with a General Store whose owner allows PCT hikers to camp out back. Only there are no trees, so I used Treez and a steel pole to make do.
Carson Pass
Trees were poorly spaced for hanging here, so I picked one and used TT for the head end.
Hat Creek Rim
I was fortunate to enjoy cool weather and cloudy skies for this stretch that's often oppressively hot and exposed. There are trees, but I couldn't find a well-spaced pair, so ...
Sonora Pass sunrise
Around 10,500'. It was a windy night, but not too cold, and the hammock's tie-outs kept the swaying manageable. This was the only overnight two-pole hang north of the desert, as trees were usually available. Here I chose to hike past the trees for this morning view, to say nothing of the jaw-dropping sunset. Besides, there was the first signal in days available on this tree-bare side of the ridge. It was a challenging hang technically, on steep loose scree where no ground-dweller would ever think to camp, but I'd gotten very confident of my Treez hanging game by that point.
Sunset at Sonora Pass
From my hammock. It's alright I guess, if you like this sort of thing.
Beautiful Foxtail Pine, Sequoia National Park
Nothing to do with hammocking, but too beautiful to leave out. In the high southern Sierra, the dead trees are more beautiful than the living. Note from the shadow that this tree is backlit. It appears luminous from all the amber resin.
Also beautiful
Also no Trekking Treez needed, except to prop up my tarp on the front porch. Just too beautiful to leave out. Note the June snow.
An OK hang
Again, no Trekking Treez in this one, but possibly the prettiest hang of my whole hike.
Heaven is a place where nothing ever happens
Sorry, you came to read about TT? Pretend I was hanging from them and enjoy the view.
Just land here? This is the last of a three-part series.
I have now reached Kennedy Meadows South, mile 702 of the Pacific Crest Trail, thus ending the desert segment and beginning the Sierra Nevada. I have not once slept on the ground so far thanks to my Warbonnet Blackbird XLC hammock and Tensa Trekking Treez as my sole sleeping arrangement. Mission accomplished!
I have needed to use one or both Treez 20 nights thus far, out of 58 nights total, so about a third. Below is a gallery of all 20 of those hangs. Because it is faster and more convenient to hang from trees, other poles, or rock features than from Trekking Treez, I used TT only when there were no reasonable alternatives. I could have used TT 100% of nights if that were my goal. As trees are more reliably available at points north, I expect to use the poles in hammock mode going forward less frequently.
Even though trees are available below treeline in the Sierra ahead, camping below treeline will not always be desirable, because safety and speed calls for crossing the high passes early in the mornings when the remaining snow is harder. Tomorrow I will set out with 12 days of food aiming to reach Vermilion Valley Ranch without descending below 10,000’ to resupply. I plan to hang from the poles above treeline amid the rocks to speed my way. This should make for some epic photos at the very least.
Another reason I will keep using the poles ahead is that they are much stronger as trekking poles than ordinary ones. While they absolutely do not replace an ice axe where necessary, I feel much more confident using Trekking Treez for stability in deep snow or boulder fields, that commonly cause ordinary lighter poles to break. The trail and hiker boxes along the way are fairly littered with snapped and bent poles. I have salvaged still-new carbide tips from these abandoned poles twice already, as I have worn through the originals.
I began this hike with a small amount of anxiety about whether TT would always work for me, given the unknown ground conditions of the desert segment. These feelings are now completely gone. Ground sleepers often stop hiking earlier in the day than they want, solely because they lack confidence of finding suitable flat, clear tent sites ahead before dark. I always hike as long as I want, knowing I can figure something out almost anywhere, whether the ground is sloped or flat, rocky or soft, and of course whether trees are present. This to me is liberating, and speeds my progress.
Of course, the greatest support to my speed and comfort on trail is the consistently restorative sleep and day lounging the hammock provides. Sleeping with feet slightly elevated is fantastic for recovery, aiding venous return from overworked legs better than the compression hosiery and pack-under-legs strategies ground sleepers often use.
In reality, a bigger issue than lack of trees for using a hammock exclusively on the PCT is the wind. While using a tent in high winds isn’t pleasant either, suffice to say it’s very good that I don’t get seasick. Guying the sides of the hammock out to ground minimizes but does not eliminate the sway. One night a stiff cross wind spinnakered me in the hammock to perhaps 30° off plumb several times. Using a tarp for wind protection can add a little warmth and stability, but at the expense of a deafening roar beyond earplugs’ ability to make soft, and the tarp’s guylines must be very strongly anchored to resist the blast.
Wind passing under the hammock draws away heat that ground sleepers retain for a given amount of insulation. When winds are up, I find using an underquilt protector essential to staying warm even when the overnight low is 25°F higher than the rating of my quilts. Equipped with 20°F quilts and protector, I was always warm enough even on the six nights I woke to ice in my water bottles.
I’m pleased to report that regardless of wind or other challenges, never once did the system collapse to drop me in the night. It is also true that my initial anchor placements failed maybe a dozen times in total during setup and testing. Proving the anchors with some hard bouncy test sits is an important part of setup. In the worst case, in an immense burn zone with dead loose soil, I had to re-set 2 of 4 anchors 3 times over half an hour before I could rest confident that they’d hold the night.
Past Agua Dulce
Was so peaceful when i set up. Then the wind started, gusting to maybe 50mph I reckon. Good thing I don’t get seasick. Rough night, but amazingly nothing broke or pulled loose, and my shoes didn’t blow away.
True desert
Spectacular site with a blood red partial eclipse, though very windy. Fairly certain nobody has ever hammocked here before.
Past Walker Pass
Challenging hang on sloped very rocky ground with loose surface dirt, but the view and company was worth it. A sapling and a shrub provided 2 anchors foot side, with a ti stake and Peggy Peg head side. Strong asymmetry of anchor placement made it necessary to lean the poles far from plumb to equalize guyline tension.
Post Aqueduct
Sheltered from the frigid hard winds in a gully past the Aquaduct in a wind farm. Loose soil was a challenge, but all held after judicious probing to place anchors behind large subterranean rocks.
Tucked into chaparral
Took a while to find a clearing large enough. All four anchors were shrub bases.
Sandy wash
Foot end on a sycamore
Acton RV park
Mostly I camped alone. This hang brought tons of other hikers asking how it worked.
Hikertown
The magical shantytown in the desert with carnival vibe. Pitched next to container as a windblock. Rock hard ground limited anchor penetration to barely over an inch after hammering in pilot holes with ti stake for Peggy Pegs, and they held.
Sunset at I-10
Near the magical water fountain at the bottom of the epic drop from Mt. San Jacinto. Through the night I watched hikers arrive at the water by headlamp, some with whoops of joy, others tears, and I cried too at the beauty.
Near Barrel Springs.
Video still because I forgot to take photo.
Wind farm
In the yard at an AirBnB near I-10. Brutally windy.
Bottom of Mission Creek
Head anchors are a single fallen log, heavy enough.
In cactus patch
9 miles shy of Paradise Valley Cafe. Got caught in a rainstorm around midnight without my tarp up because I didn’t check the weather. Miserable wet pre-dawn hike out to dry down in Idyllwild.
Several people have recounted thru-hiking the 2,653-mile Pacific Crest Trail using a hammock as their primary sleeping arrangement. All of the reports we’ve seen describe frequently sleeping on the ground with their hammock in the ~700-mile desert sections from the Mexican border to the southern Sierra Nevada, after which trees become more reliably available. Sleeping on the ground (or even beds) isn’t what we mean when we say hammocking.
What if you could reliably hammock in the total absence of trees, say above treeline in the Sierra, or on brush-covered slopes where no tent can go, or on a sandy plain full of cactus, all within the constraints of lightweight, long-haul backpacking?
I’m Todd, Tensa Outdoor co-owner, now about 150 miles into my northbound PCT thru-hike attempt, using Tensa Trekking Treez and a Warbonnet Blackbird XLC hammock as my only bed. My business partner Cheryl not only engineered this system of trekking poles that converts to a hammock stand, but she’s retired from her medical career allowing me to step away from the business these months to show what it can do. I’m a very lucky man at 56.
So far, I’ve spent not a single night on the ground or even in beds when overnighting in civilization. My goal is to hammock the entire way, as I have every night since 2013 under easier conditions. Indeed, I’m carrying no sleeping pad or similar ground arrangement. I’m pretty sure I’m the most comfortable hiker on trail, and I’m having the time of my life!
I’m also field testing some new and experimental elements of Trekking Treez that will likely soon become standard or optional elements of the system. So far, everything’s performing beautifully in very tough conditions.
Right this moment I’m in my hammock hung from the log joists of a rustic cabin while resupplying in Idyllwild below Mt. San Jacinto, where I learned backpacking as a child in the 1970s. Nostalgia overload! Tomorrow I take on the mountain.
Here’s a gallery of every hang I’ve made so far, all 14 nights. I’m keeping a record for bragging rights to show how Trekking Treez make it possible to tackle trails like this without compromising on the restorative comfort of hammocks, safely and reliably.
Just past Campo
First night, both poles in a gravelly wash. Anchors held. Very cold though. This was a popular tent campsite, party atmosphere, almost a rave within hours of me setting up alone. I soon learned to seek more secluded sites where tents can’t go for my solitude needs.
Hauser Canyon
Trees are convenient.
Boulder Oaks
One gorgeous California Live Oak, one pole, no problems.
Mt. Laguna Lodge
I’m not kidding about not sleeping outside of a hammock. Trekking Treez isn’t designed for indoor use, but I’m resourceful. Anchors are wedged between the queen bed box spring and its permanent base bolted to the floor. Door hinge pin on the head end. No damages, no bedbugs or mites, no backache, no sheets to wash. Inside because heavy electrical storm with hail struck as soon as I arrived up top the snowy summit, and I needed to pick up my underquilt protector the next day at PO for necessary warmth.
Windy
Most challenging hang. Compound slope made hang geometry hard to assess. Pulled up a dead shrub as anchor (should have known better). Needed 2 anchors in the shrub’s crater to hold. Very loose, light, dry leaf litter as main soil component. Very high winds spinnakered me in the hammock to perhaps 20° after I sleeved the tarp whose roar was deafening. But pretty dawn light.
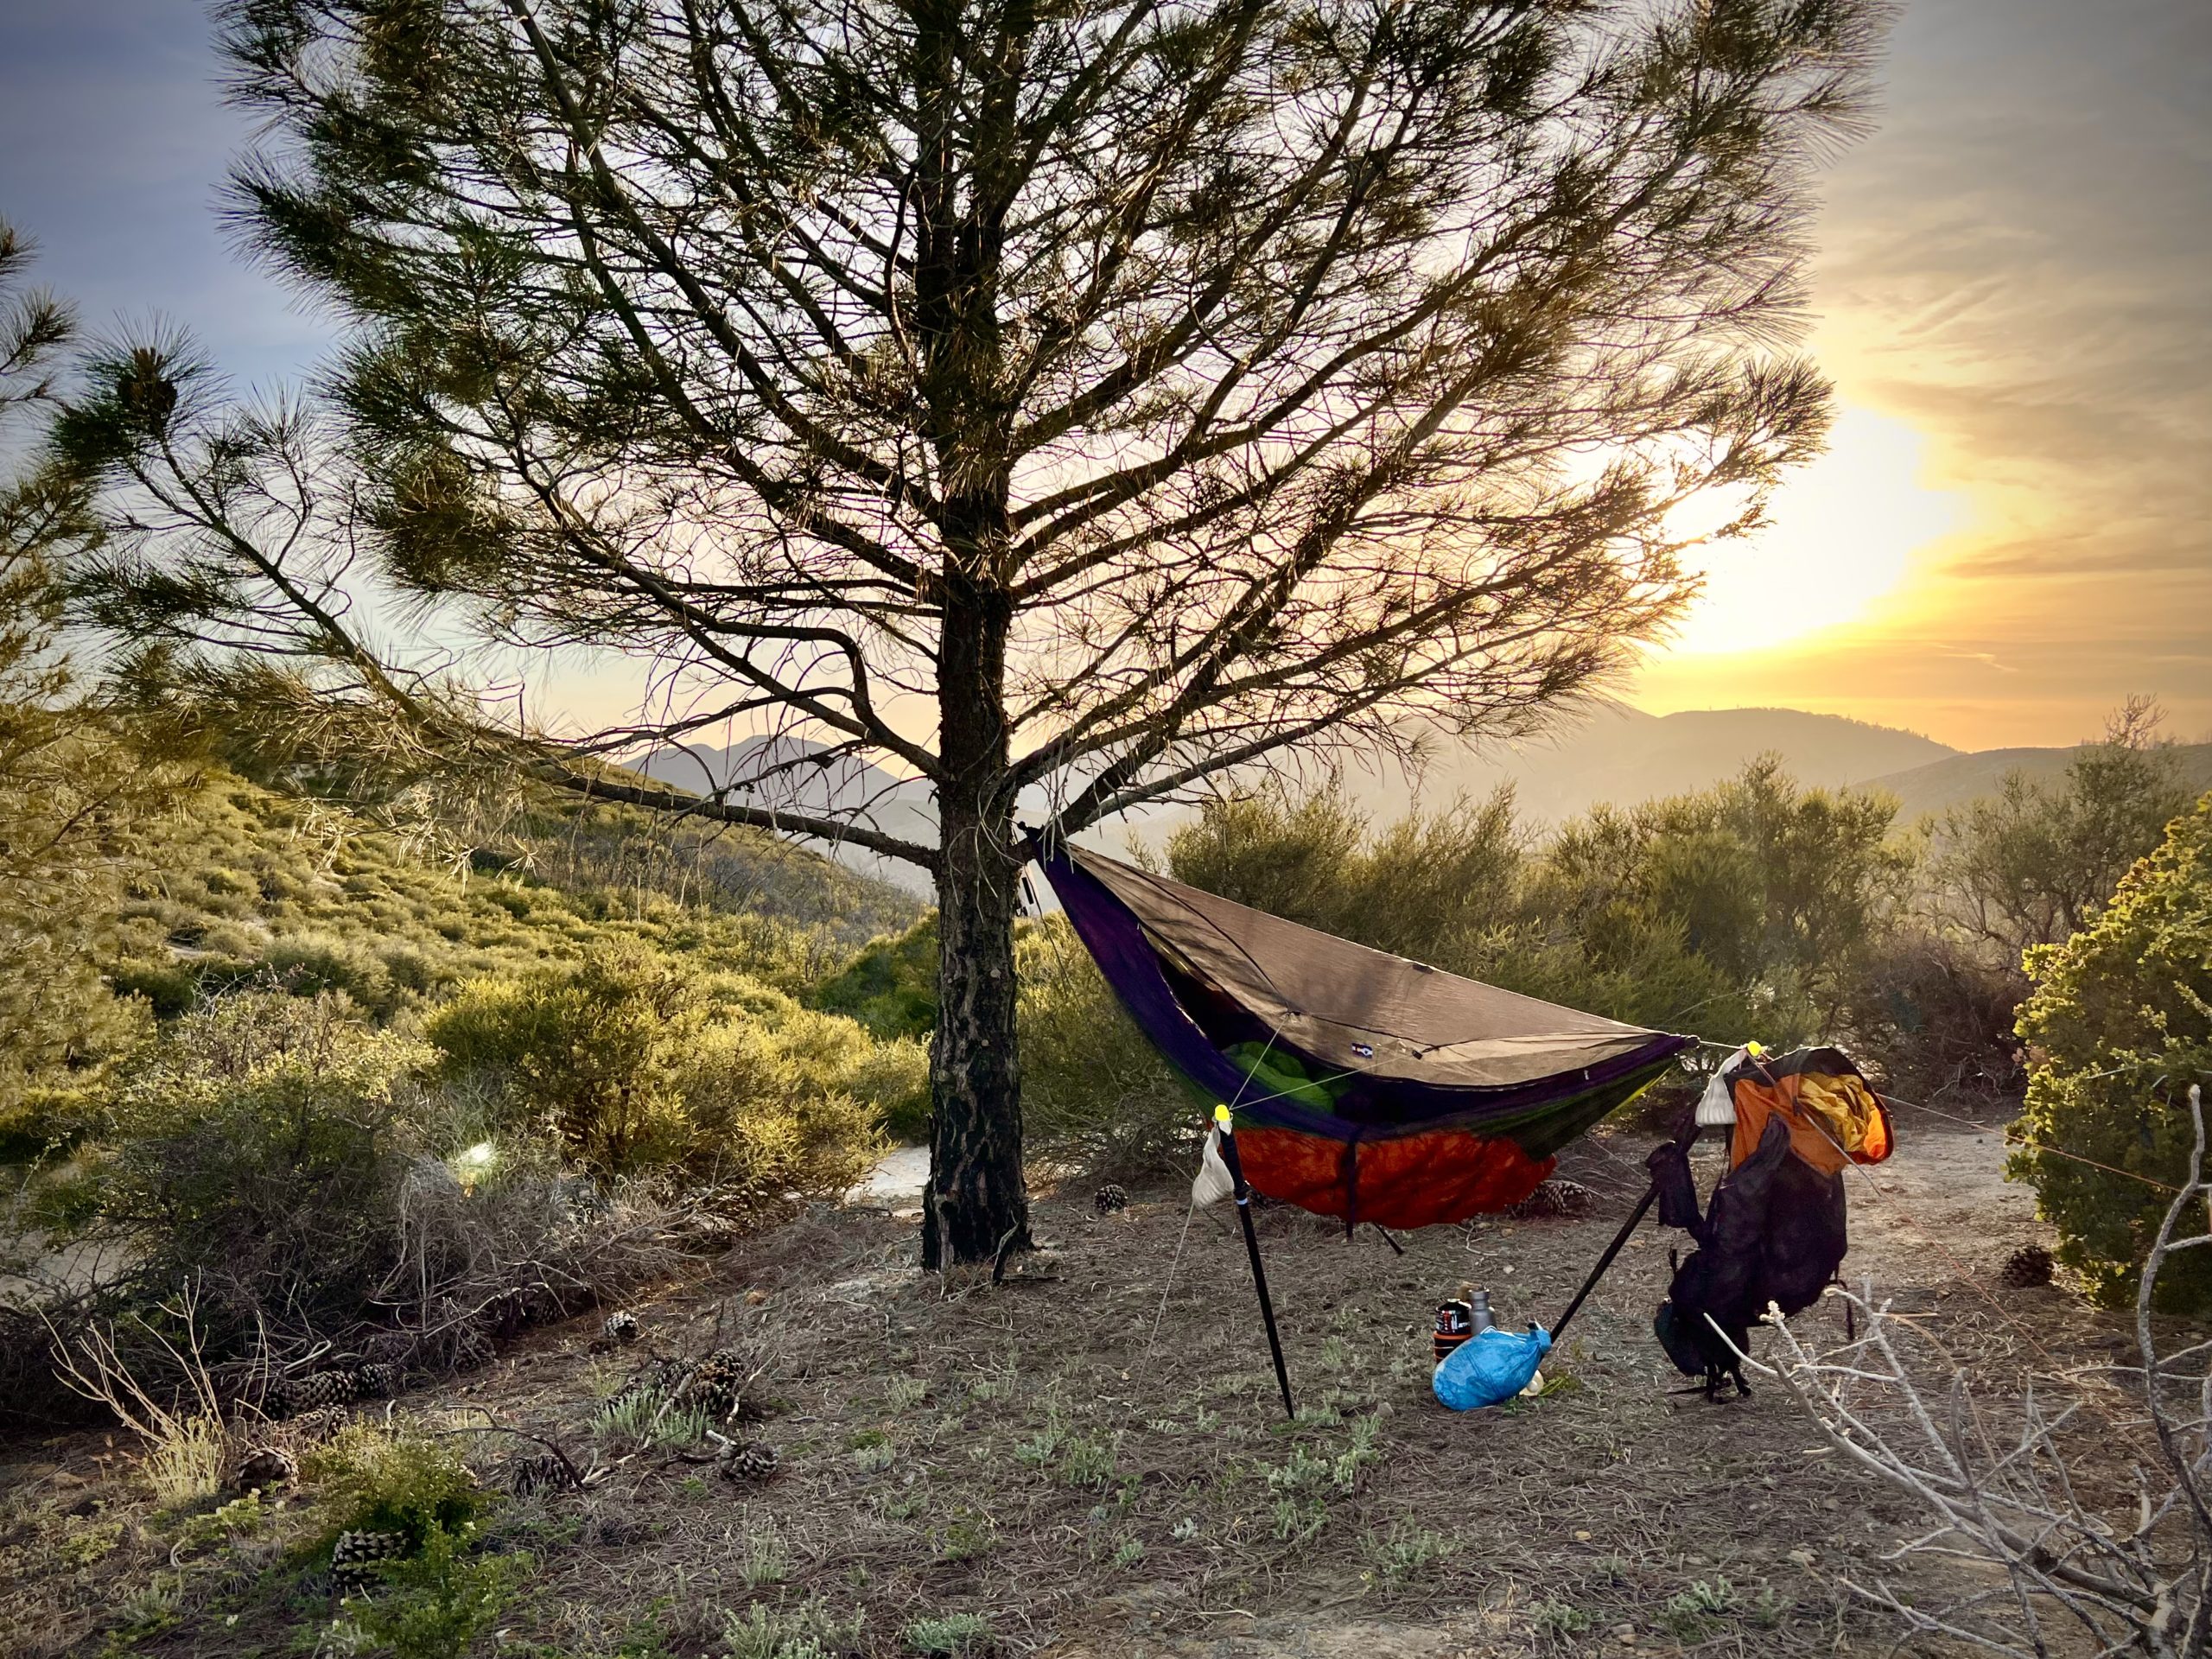
Penney Pines
One Ponderosa, one pole, with tarp. The wind in the pines under bright moonlight was magical.
Before Scissors Crossing
Pretty hang using both poles, 4 anchors, with tarp. Loose gravelly soil required some excavation before one anchor would hold.
Warner Meadows
Wonderful hang from a single mighty oak branch near Warner Meadows. Woke to sounds of turkeys, quail, mourning doves, ravens, scrub jays.
After Scissors Crossing
A pure rock hang above the cactus gardens past Scissors Crossing. Learned that dyna-weave suspension (really, most anything) is easily shredded by sharp granite. Ended up hanging from titanium Boomstake sans boom from a cleft in the rock instead of trying to wrap the rock. Beautiful clear night full of meteors.
Caliente Creek
Beautiful, peaceful, classic tree hang on upper Caliente Creek.
Before Paradise Valley Cafe
Two bushes, two ground anchors. Left off tarp extensions again, a bit over 9 miles shy of Paradise Valley Cafe. I sorely regretted this when a storm I’d not anticipated rolled in around midnight, soaking me and my quilts as I scrambled to pitch tarp by headlamp in high winds, and see all that prickly pear where the tarp stakes want to be? Many barbs embedded in my fingers! Live and learn.
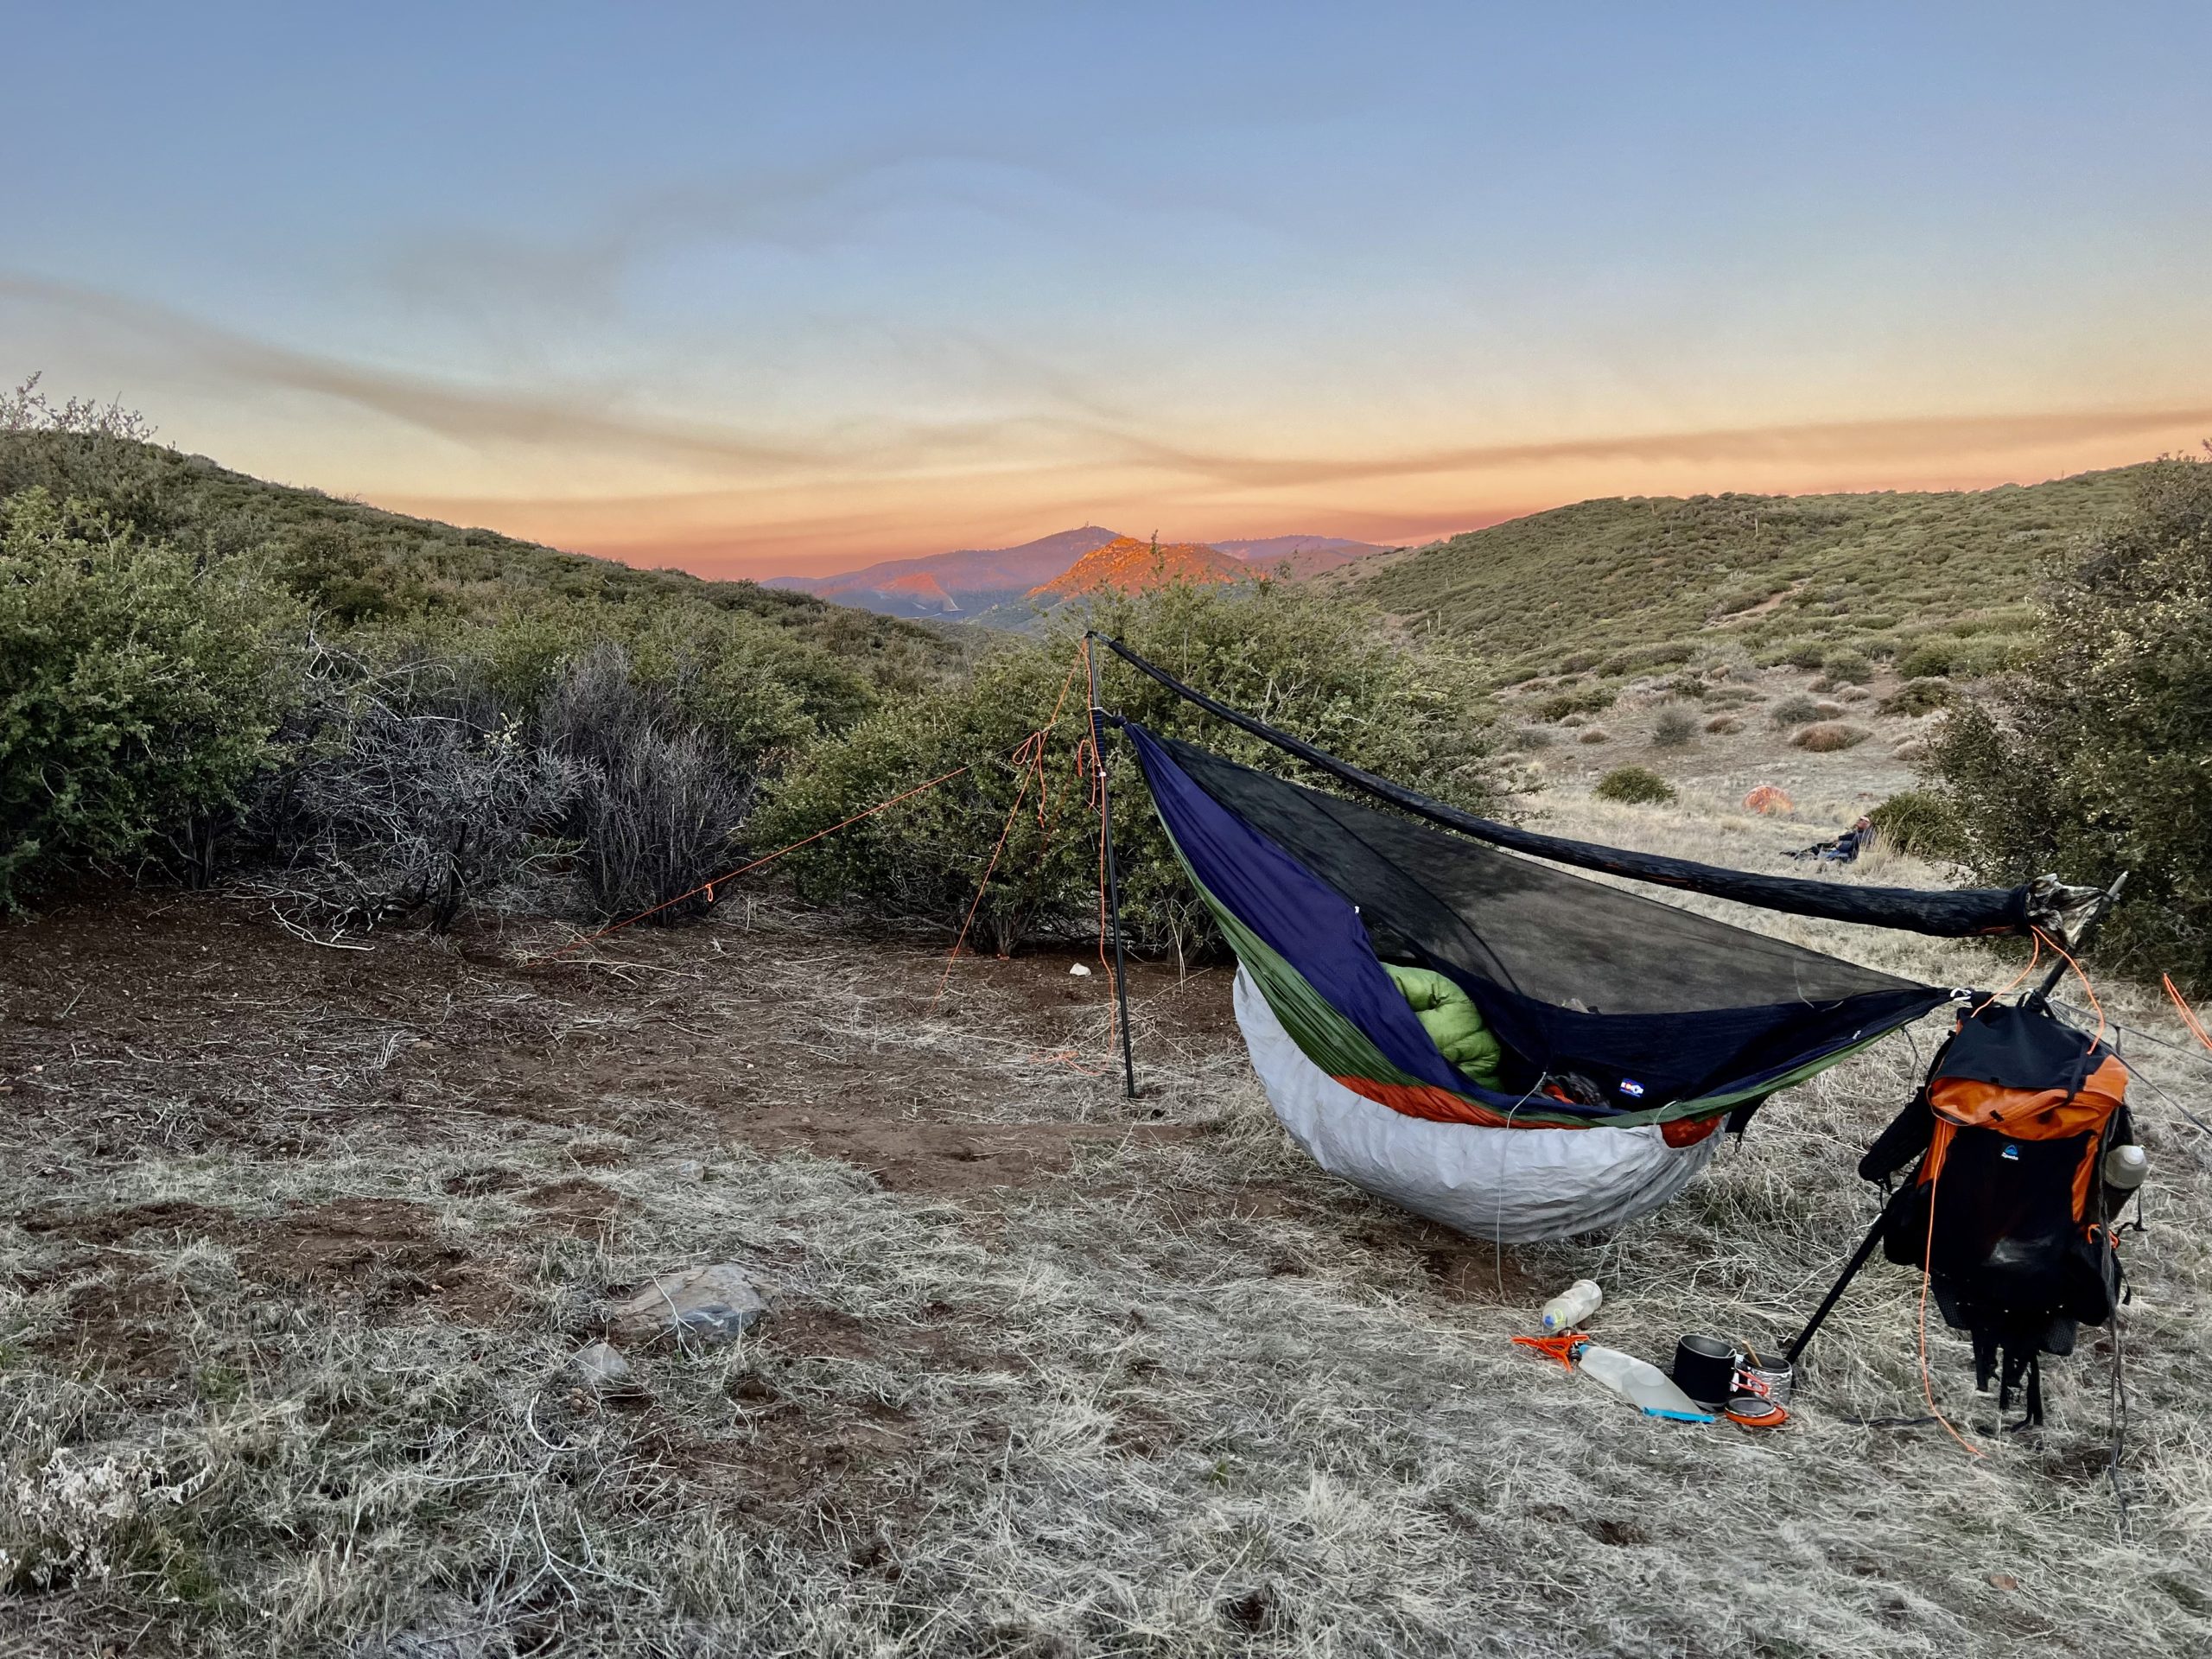
After Mike’s Place
No trees, no problem. Just past Mike’s Place in a little clearing on a slope, my asymmetric anchor placement led me to experiment with the poles out of plane to equalize what would have been asymmetric guyline tension. Left off tarp extensions because forecast called for a clear night.
Idyllwild
In a cabin hanging from the rafters at Idyllwild cleaning up, resupplying. My first full zero-miles day.
Before Barrel Springs
I forgot to photo; this is a still from a video. This hang came together easily using the bases of three chaparrals and one ground anchor, shortly before Barrel Springs. Note rock preventing foot from sinking into soft ground.
It’s much easier to find one good tree than two correctly spaced, especially in the American west. And where there are no trees at all, often a vehicle can support one side of a hammock. We design our hammock stands to exploit these facts to the fullest, offering Tensa Solo and Trekking Treez singly instead of in pairs. This assures better portability and economy than any other stands we know. Even Tensa4, that doesn’t come in a single-side variant, can hang two hammocks from a single tree or similar support.
Earlier this summer my son and I hiked part of Mt. Hood’s Timberline Trail. We brought a pair of Trekking Treez, as the glacial stream crossings are much safer with poles than without, to say nothing of the treacherous scramble below McNeil Point. Using a single pole per person is half the weight and expense of two, while Trekking Treez’s strength, much greater than typical trekking poles, inspires plenty of confidence even under full body weight.
When we reached our overnight destination of Elk Cove late in the day, in the tree-sparse high alpine zone, we made use of a single Whitebark Pine to hang both our hammocks, far more quickly and sociably than if we’d needed to find separate pairs of trees. We could have pitched tarps, but the clear skies gave us unforgettable views of the Milky Way and even the Neowise comet.
Later in the season, we traveled to Crater Lake. Smoke from the wildfires had only begun to dim the views, but we found refuge near the headspring of the Rogue River on the western slope of the volcano. Not wanting to leave our river view or bushwhack too much to find four suitable trees clear of underbrush, we split one Tensa4 stand into two halves to hang us both from one tree.
A single stake under the head end apex secures a V-shaped guyline running along the ground to prevent the feet from sliding treeward. The same stake provides an anchor point to prevent the stand tipping for more security; we just hung our packs from the head ends instead. It was useful to have had two extra ball loop connectors than come with the stand to connect the feet to the ground straps, but otherwise we used no additional parts.
We brought the stand along because we planned later to camp at hot springs in the treeless scrub near the Alvord Desert, where we’d hang from the roof rack of our vehicle in a similar manner. Sadly, the wildfire smoke became too oppressive even that much further east, so we ended our trip without photos of that arrangement.
Hammocks and the tropics go together like tacos and more tacos. Hammocks were born in the tropics. Hammocks on a beach are as ideal, iconic, romantic, and often elusively unrealistic as driving a convertible sports car on a beautiful, empty, twisty country road.
You can’t always get what you want.
The sad truth is that fewer and fewer popular tropical travel destinations accommodate hammocks well or at all, at least close to the water. Either trees are absent, too small, or protected by regulation from the damage that visitors inflict with poor hanging practices. Hanging from shallow-rooted palms or under coconuts can even be deadly. Hammocks are not allowed to be hung from trees in Dry Tortugas National Park, for instance, only a few hundred miles from where Columbus found the Taino people enjoying hamacas as their regular beds.
That’s why customer Matt S. and his girlfriend were “the envy of most of the other campers” with their Tensa4 stand, which happens to pack to carry-on size:
Tensa Outdoor partner Cheryl is a passionate scuba diver and an every-night hammock sleeper. She recently enjoyed a 15-day diving trip in Baja California with her husband. In four of the five places they stayed, both outdoors and in, hanging hammocks would have been impossible without Tensa4, either for lack of hanging points or by regulation. With the stand, she was able to sleep every night as she is accustomed, in unmatched coolness and comfort.
On the return leg, in Joshua Tree National Park, she quickly rigged up a novel hammock chair stand she dubs Tensa3, which is simply 3/4 a Tensa4. When the light is just right, the pyramid focuses the cosmic rays to decalcify her pineal gland, right smack dab in the middle:
Could you use such an arrangement to field dress hunting quarry? Suspend a cauldron over a fire? Frame a lavvu or tipi-style shelter? Prop up … most anything? Of course. Poles predate and surpass the wheel in general usefulness.
But if you try sometime you find
You get what you need
Bushcrafted on the spot, lashed connections. Published here previously, it’s just too beautiful not to re-use.
The idea behind our Tensa4 stand is so simple that inexpensive homemade versions are irresistible. There have been several dozen DIY builds shown online since we showed our prototype in October 2017. They can be hard to find in the ephemeral jumble of social media streams, with their poor search features, and build details are scarce. To help fix this, we present below three builds that seem to us especially good: simple, cheap, and not requiring fancy tools or skills to make.
Dane’s bare bones tensahedron
One of the earliest builds is still startling for low cost, at $21. Poster Daneaustin3 presented it in November 2017:
No stand ridgeline necessary when hammock has one.
In his own words:
3/4″ EMT conduit with 220lbs in it. I used steel cable to hold the conduit together.
Parts:
4x 3/4 conduit cut to 95″ (fits in my 8′ bed truck) $4.25 ea
4x 1′ steel cable $.36 per foot
4x cable clamps $.63 ea.
Total cost $21
Travis’s segmented fence top rail tensahedron
Hammocks not commonly seen in these here Utah parts.
Travis Hodgson (aka fivefreds), wasn’t the first to use fence top rail instead of EMT, but he did put up some good photos. Top rails are heavy and strong. These come typically 10′ long with one end swaged. Chop the pole in half for easier transport, and you can insert the swaged end into the middle to rejoin, securing with a pin. 10′ is more than long enough, so you might chop 3-10″ further off the sections.
Travis’s pole connectors are super elegant: continuous loops of Amsteel rope pushed through grommeted holes drilled in the pole ends, and then looped over the pole ends to secure.
It’s important to assure that the holes in the poles don’t cut the rope used to connect them. Grommets are a good idea, because steel can be hard to de-burr adequately. The coolest grommets I’ve seen are short pieces of copper tubing inserted through the holes and hand peened smooth:
Hard metal, meet soft metal. Artisanal peening.
Mike’s telescopic EMT conduit clothes line tensahedron
Save on power bills with this elegant laundry desiccation apparatus where permitted by homeowner covenant.
Mike Jones’ build uses two telescoping sizes of conduit to allow the poles to collapse to about half the full length for easier transport. Multiple stops make the poles adjustable length. The joint is near the middle, the weakest part of the pole, but 1″ steel conduit is pretty strong, and the overlap generous to take up much of the slop between EMT sizes.
The adjustable poles get just long enough to tension your tarp.Round wire locks pin the poles at desired length.Note how poles needn’t touch each other? Tensegrity design has compression members floating in tensioned lines.
In Mike’s words, edited:
Maximum length of each pole is 9’6″ and collapses down to 5’4″. Materials added up to about $50 provided you already have tools, hammock setup, and some 550 paracord.
Parts:
Two: 10′ x 3/4″ EMT
Two: 10′ x 1″ EMT
550 paracord (used to attach the two points that touch the ground together. As well as button knots on a loop, like MeyersTech ties, to run though the 3/8″ holes attaching the poles together.) This will likely be replaced by Amsteel or webbing over time.
One: 1/4″ PEX tubing (I found a 5′ length to buy but I only needed 1.5″ or 2″ per hole in the EMT to create a bushing so the paracord is not cut by the EMT. I had to heat the end of the PEX over a candle to flair it out.)
Various hammock straps and lines to attach the hammock and tarp
Eight: Rubber Leg Tips. I used 3/4″ tips for the 3/4″ tubing but I would likely buy 1″ tips if I make it again. Then I used 1-1/8″ tips for the 1″ tubing. Then I placed 1″ and 1-1/4″ fender washers inside the rubber leg tips so the EMT tubing does not cut through.
Four: 3/8″ x 1-5/8″ Round Wire Locks. These are to secure the telescoping poles at various lengths while in use and in the compact mode for transportation.
I used the 9’6″ set up for my 12′ tarp, and it worked great, but a shorter pole length would also work. If you keep the two poles that touch the ground at 90° to one another, the following table of pole lengths will be a good estimate of ridgeline (hypotenuse) length. There is plenty of wiggle room here, but it gives you a starting point.
Pole
Ridgeline
9.5′
13.4′
9′
12.7′
8.5′
12.0′
8′
11.3′
7.5′
10.6′
5.5′
7.8′
Tensa4 is our trademark, Mike! We call other builds tensahedrons (tensegrity+tetrahedron).
Want another EMT version that packs even smaller? See US soldier Kamileon’s build.
Other approaches
In addition to steel, DIY tensahedrons have been made from wood, bamboo, fiberglass, aluminum, and carbon fiber.
The pole material determines the necessary diameter for enough strength. For about 300lbs in the hammock, 3/4″ is adequate for most steel including EMT conduit. 1.5″ is likely enough for aluminum in wall thicknesses above 1mm. Wood and bamboo can be very beautiful, but as irregular natural materials, it is important to select carefully: 2 inches is a prudent minimum for clear wood (no knots, straight grain) or structurally sound bamboo.
The poles must be joined at their ends into a diamond shape, with none of the joints having fixed angles, but instead floppy, permitting the poles to assume any angle, and to rotate at least several degrees. We favor rope loop connectors as simple and field serviceable, but various combinations of hardware and even lashing can also work. Avoid using hardware that can put bending moment on the poles when loaded, such as eye bolts protruding from the sides of the poles: poles should be in pure compression, lines in tension.
Joints along the poles can be points of failure, especially near the middle. Best to use either very strong materials, split into an odd number of segments, or both. (Tensa4 poles are divided into 7 segments, with the largest diameter in the middle).
Why are we telling you this?
As a company, our focus is on products offering value beyond what people can easily make for themselves. Why promote cheap alternatives to buying our stuff?
Apart from us doing all the work, burdening nobody with the task of reading long blog posts, the special value of our Tensa4 stand is how we’ve made it pack so small and light: carry-on airline luggage, easy to pack on a bike with a motor or not, in a subcompact car, Cessna 150, kayak, or even a backpack. We realize that this amount of portability isn’t worth the price to everybody, especially large families seldom far from large vehicles, scout troops, extremely cool small national armies, or people who want only a home solution. We can’t compete with your local hardware store for basic poles if you’re willing to contribute labor. We truly love helping people get off the ground with hammocks, especially where they couldn’t without this design.
Meanwhile, we figure the more people embrace the basic design, the more interest may turn to our packable dialed-in version, in 28 segments of custom made telescoping aluminum, keyed and anodized, not available at Home Depot. Quite a few of our customers, in fact, made one or more stands themselves before buying Tensa4.
Freestanding postscript
Lots of people are put off by the anchoring requirement of a classic tensahedron. Well, you can swap two lines for poles and make a completely free-standing version. Check DIY details given here: Introducing Tensa4 Freestanding/.
That’s Navajo for Valley of the Rocks, or Monument Valley. Sited within the Navajo Nation, there’s no image more iconic or clichéd for the US desert Southwest. The first written account of the place is from a US Army officer in 1859, who found it “as desolate and repulsive-looking a country as can be imagined,” citing the lack of tree cover. No place for a couple of Norwegian hammocks, surely.
The Mitten and Merrick Buttes, yeah, behind the weird hammocks. Photos by AZsteelman.Amok Draumr transverse hammocks pining for the fjords. Tensa4 on the right; DIY tensahedron on the left.Sunrise after what must have been a sublime night of stargazing.
Hammock camping in the US is much more popular east of the Mississippi than west. The humidity of eastern summers makes tents miserable, while hammocks are famously cool without bottom insulation. Then of course, there are lots of trees too. Out west, the most common reaction among tent campers to the idea of hammock camping is “that’s fine if you have trees.” Many who have discovered the comfort of hammocks keep and travel with a separate ground-based system “just in case.” We are putting an end to this.


 is easily shredded by sharp granite. Ended up hanging from titanium Boomstake sans boom from a cleft in the rock instead of trying to wrap the rock. Beautiful clear night full of meteors.")


